Disclaimer

The views expressed on this blog are my own and do not necessarily reflect the views of my employer.
Showing posts with label sxde 9/07. Show all posts

Thursday, July 31, 2008

Wine on Solaris and Linux


Wine -- the one and probably the only tool for Solaris, Linux (& Unix too) to execute a *.exe file. Actually , "Wine is an Open Source implementation of the Windows API on top of X, OpenGL, and Unix." Wine is available for solaris , bsd unix and various linux distros ( Redhat, Fedora, ubuntu, debian... n more), Check out the full list and get wine now !!

** I think wine installation as root will never create any problem to the system , but running wine as root may give windows viruses access to the system. So it's wise to be a bit careful while working with wine.

I tried wine on various solaris distributions like Solaris 10, SXDE (Solaris Express Developer Edition) 9/07 , SXDE 1/08 , OpenSolaris 2008.05 etc. and found 3 different ways of wine installation.

I) Build from source : Probably the most native way , but worked for me on SXDE 1/08.
What I did to install wine in my system is the following :

1) Download wine from here. Mine version was wine-1.1.0 , it was a *.tar.bz2 file.
2) Extract files using gui tool.
3) copy the wine directory to /opt, and navigate to that directory.
#cp -r /export/home/ritwik/Desktop/wine1.1.0 /opt
#cd /opt
#cd wine1.1.0
4) Add /usr/ccs/bin and /usr/sfw/bin to the path.
#PATH=$PATH:/usr/ccs/bin:/usr/sfw/bin
5) perform "#./configure" . During that process I came to know that in my system some development files were missing :

#./configure

--------------------- many lines omitted ----------------------------------
configure: libXxf86vm development files not found, XFree86 Vidmode won't besupported.
configure: libxrandr development files not found, XRandr won't be supported.
configure: libsane development files not found, scanners won't be supported.
configure: liblcms development files not found, Color Management won't be supported.
configure: libldap (OpenLDAP) development files not found, LDAP won't be supported.
configure: libcapi20 development files not found, ISDN won't be supported.
configure: libcups development files not found, CUPS won't be supported.

configure: Finished. Do 'make depend && make' to compile Wine.

6) Then I tried gmake , it was completed with some warnings like :

regsvr.c:633: warning: visibility attribute not supported in this configuration; ignored

I got the same warning (i.e visibility attribute not supported in this configuration)from a lot of *.c files during this GNU make process.

7) Anyway , after that I added the path to the .profile file at my home. I just append this line to the file :

PATH=$PATH:/opt/wine-1.1.0

8) Now I can use "$wine *.exe" to execute a *.exe file.

I tried this method on SXDE 9/07. Check out what happened.

II) Solaris 9 and 10 : I think Blastwave.org provides the best possible way with different flavors of wine and complete installation instructions. Check out here !

III) Doug Scott's wine build instruction : Applicable for open solaris distros like SXDE (Solaris Express developer Edition ) . Check out Doug Scott's CBE wine build instruction from here !

I tried all of the above said methods on OpenSolaris 2008.05. Here is my experience.

I am also a fedora linux user , and I used to download and install wine on fedora ( Fedora 7, 8, 9) by using yum. One simple "#yum install wine" command does everything !
Wednesday, June 25, 2008

OpenSolaris - OpenSolaris File sharing (OpenSolaris 2008.05 & SXDE 1/08)

Network file sharing in open solaris system is quite easy !! I am working behind a router which connects my desktop system and my laptop . OpenSolaris 2008.05 is installed on my desktop pc with ip address 192.168.1.105 and SXDE (solaris express developer edition) is installed on my laptop with ip address 192.168.1.103.

Now configuration details for my laptop (SXDE 1/08):
(This method is also applicable for SXDE 9/07)

*A ping test to make sure that they are reachable to each other.

-bash-3.2# ping 192.168.1.105
192.168.1.105 is alive
** Go to services. (for sxde 1/08, start -> administration -> Services). Activate NFS services.

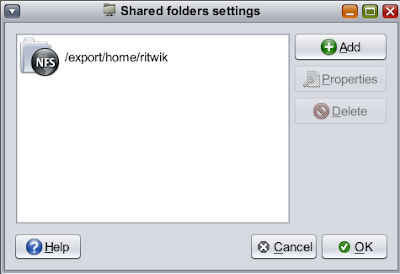
*** Go to Administration -> Share Folder. Click on 'Add'.


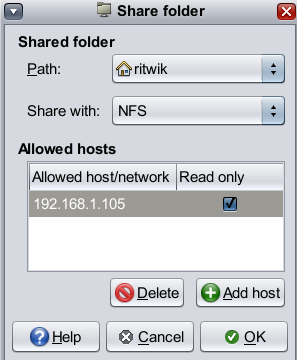
1)Now select the path to the folder you want to share , by default your home directory will be selected. I have shared the default directory to NFS.

2)Share with : NFS


3)Click on "Add Host"

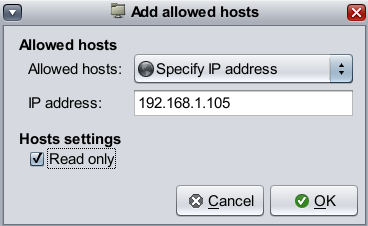
Allowed hosts : Specify IP address
enter IP address : 192.168.1.105
Check out the 'Read Only' box in Hosts settings if you want to give 'Read Only' permission.


Click OK to exit the wizards.

Now configuration details for my desktop (OpenSolaris 2008.05):

*A ping test to make sure that they are reachable to each other.

-bash-3.2# ping 192.168.1.103
192.168.1.103 is alive
** Go to services. (for OpenSolaris 2008.05, browse it from system -> administration -> Services). Activate NFS services.

*** Go to Administration -> Share Folder. Click on 'Add'.

1)Now select the path to the folder you want to share , by default your home directory will be selected. I have shared '/export/home/ritwik/softwares'.

2)Share with : NFS

3)Click on "Add Host"

Allowed hosts : Specify IP address
enter IP address : 192.168.1.103
Check out the 'Read Only' box in Hosts settings if necessary.
Click OK to exit the wizards.

Optional Steps :

Now check out whether NFS server is running properly :
# svcs network/nfs/server
You should get a result like :

STATE STIME FMRI
online 21:22:11 svc:/network/nfs/server:default

Now check out Shared files :
#exportfs
From my laptop I got a result like :

- /export/home/ritwik sec=sys,ro=192.168.1.105 ""

and from my desktop,

- /export/home/ritwik/softwares sec=sys,ro=192.168.1.103 ""

You may also check /etc/dfs/dfstab , the file in my laptop was looking like :

# Do not modify this file directly.
# Use the sharemgr(1m) command for all share management
# This file is reconstructed and only maintained for backward
# compatibility. Configuration lines could be lost.
#
# share [-F fstype] [ -o options] [-d ""] [resource]
# .e.g,
# share -F nfs -o rw=engineering -d "home dirs" /export/home2
share -F nfs -o sec=sys,ro=192.168.1.105 /export/home/ritwik

Now , make a mount point.

bash-3.2$ mkdir dsktopShare (in my laptop)
bash-3.2$ mkdir laptopShare (in my desktop)

Mount the shared file :

-bash-3.2# mount -F nfs 192.168.1.105:/export/home/ritwik/softwares /export/home/ritwik/dsktopShare(from my laptop)

-bash-3.2# mount -F nfs 192.168.1.103:/export/home/ritwik /export/home/ritwik/laptopShare
(from my desktop)

Unmount in the following way :

# umount /export/home/ritwik/dsktopShare
# umount /export/home/ritwik/laptopShare

Tuesday, May 20, 2008

Mount ntfs partitions of an external USB device in solaris

If you want to mount ntfs partitions from an external usb storage device , you need to follow first 2 steps from this post. then do the following :

#fdisk /dev/rdsk/c2t0d0p0

I got a result like :

......

Total disk size is 9729 cylinders
Cylinder size is 16065 (512 byte) blocks

Cylinders
Partition Status Type Start End Length %
========= ====== ============ ===== === ====== ===
1 Active IFS: NTFS 0 2610 2611 27
2 EXT LBA 2611 9727 7117 73


SELECT ONE OF THE FOLLOWING:
1. Create a partition
2. Specify the active partition
3. Delete a partition
4. Change between Solaris and Solaris2 Partition IDs
5. Exit (update disk configuration and exit)
6. Cancel (exit without updating disk configuration)
Enter Selection:


6

#

above result told me that the first partition of my device , i.e c2t0d0p1 is a ntfs partition.
Then I do the following :

#cd /mnt
#mkdir usb
# mount -F ntfs -o ro /dev/dsk/c2t0d0p1 /mnt/usb

you can execute the following :

#rmformat

I got a result like :

Looking for devices...
1. Logical Node: /dev/rdsk/c2t0d0p0
Physical Node: /pci@0,0/pci152d,754@1d,7/storage@1/disk@0,0
Connected Device: ST380211 0A 3.AA
Device Type: Removable
Bus: USB
Size: 76.3 GB
Label:
Access permissions: Medium is not write protected.
2. Logical Node: /dev/rdsk/c0t0d0p0
Physical Node: /pci@0,0/pci-ide@1f,1/ide@0/sd@0,0
Connected Device: Optiarc DVD RW AD-7530A EX32
Device Type: DVD Reader/Writer
Bus: IDE
Size:
Label:
Access permissions:


I will encourage you to check out this documentation for more detailed information about usb storage support in solaris.

Monday, April 28, 2008

Mount NTFS partitions in solaris

Today I mount my ntfs partitions in my solaris system (presently I am using solaris express developer edition 9/07). [ This method is also applicable for SXDE 1/08 and OpenSolaris 2008.05 ]. Here I am giving you a step by step instruction for the process :

1) Install the FSWpart package

Download : Click here.
Uncompress: gunzip -c FSWpart.tar.gz | tar xvf -
Install: pkgadd -d . FSWpart

2) Install the FSWfsmisc package

Download : Click here.
Uncompress: gunzip -c FSWfsmisc.tar.gz | tar xvf -
Install: pkgadd -d . FSWfsmisc

3) execute the following to identify your ntfs partitions , then press 6.

#fdisk /dev/rdsk/c1d0p0

I got a result like :

Total disk size is 14593 cylinders
Cylinder size is 16065 (512 byte) blocks

Cylinders
Partition Status Type Start End Length %
========= ====== ============ ===== === ====== ===
1 IFS: NTFS 0 3186 3187 22
2 Active Solaris2 3187 7132 3946 27
3 IFS: NTFS 10320 14592 4273 29
4 EXT-DOS 7133 10319 3187 22


SELECT ONE OF THE FOLLOWING:
1. Create a partition
2. Specify the active partition
3. Delete a partition
4. Change between Solaris and Solaris2 Partition IDs
5. Exit (update disk configuration and exit)
6. Cancel (exit without updating disk configuration)
Enter Selection:
6
#


note the digits before IFS: NTFS. In my system c1dop1 and c1d0p3 were ntfs partitions.

4) Make a mount point.

#mkdir /mnt/windowsa
(and #mkdir /mnt/windowsb)


5) execute the following command according to your partition no.

#mount -F ntfs -o ro /dev/dsk/c1d0p1 /mnt/windowsa
(and #mount -F ntfs -o ro /dev/dsk/c1d0p3 /mnt/windowsb)

6) This step is optional. you may perform this step if you want to mount a partition
during system startup.

#gedit /etc/vfstab

Now you need to add one line for each partition in the end of this file :

/dev/dsk/c1d0p1 - /mnt/windowsa ntfs - yes -
(and /dev/dsk/c1d0p3 - /mnt/windowsb ntfs - yes -)


Click here if you want to mount ntfs partitions of an external usb device.

Click here to check out official documentation.

Also check out how to Mount NTFS / Ext2 / Ext3 / FAT 16 / FAT 32 in Solaris from Pradhap's blog.

Monday, April 21, 2008

Audio,Video player for Linux and Solaris

I am using fedora 7 and solaris XDE 9/07. I am using 'mplayer' in linux system since long. It can play almost all audio and video formats. If you want to download it in your linux system , simply execute the following command to get it via subversion :

#svn checkout svn://svn.mplayerhq.hu/mplayer/trunk mplayer

Update using :

#cd /mplayer
#svn update

Install mplayer in easy steps :

#./configure
#make
#make install

Mplayer is now installed in your system. Check "man mplayer" for necessary instructions. If you want to play a media file using 'mplayer' ,follow the steps :
'open with..' --> browse --> choose 'mplayer' from installation directory (/mplayer).

[ Check out how to add skin to mplayer ]

"MPlayer" is also available for solaris. Simply execute

#pkg-get -i mplayer

If you don't know how to use pkg-get in solaris , click here.

If you want to play a media file using 'mplayer' ,follow the steps :
'open with..' --> browse --> choose 'gmplayer' from /opt/csw/bin.

That's all !! use mplayer and enjoy !!

[ This method is NOT applicable for OpenSolaris 2008.05 , Check Out how to install mplayer on OpenSolaris 2008.05 from "Sound & Video" ]

yum in Linux , pkg-get in Solaris

I am using fedora 7 and solaris express developer edition (9/07) in my multiboot system. 'yum' is always my favorite for updating my linux system and softawre installations.

[Check out other ways of software installation and new IPS feature of OpenSolaris 2008.05!!]

Blastwave offers similar kind of help to solaris users. A simple 'pkg-get -i xxxxxx' command will install your required softwares in your system without creating any problem. You need to simply install 'pkg-get' and 'wget' in your system to use this. what I did ,

# pkgadd -d http://www.blastwave.org/pkg_get.pkg

# /opt/csw/bin/pkg-get -i wget

If you use yum , sometime you must use '-y' option to avoid annoying user interaction. Similarly , you can execute the following command in solaris :

#cp -p /var/pkg-get/admin-fullauto /var/pkg-get/admin

Now , if you want to install xxxxxx in your system , you need to simply execute

#/opt/csw/bin/pkg-get -i xxxxxx

If you want a list of available packages , click here.

For step by step installation instructions , click here.

Sunday, April 13, 2008

Reinstall solaris grub menu

ohhh no !!!!! my fedora update killed my solaris grub menu !! I have a multiboot system where I was using fedora's grub . Yestarday , I applied "yum -y update" to update my system . But, after that I was facing a strange problem. After switching on my laptop when I select solaris and press the return key it was showing me something like :

Solaris XDE 9/07
rootnoverify (hd0,1)
chainloader =1
GRUB

and after a moment boot prompt was coming again ,i.e solaris grub menu was not coming up.

Anyway, before fedora update , /etc/grub.conf was looking like :

#boot=/dev/sda
default=0
timeout=15
splashimage=(hd0,4)/grub/splash.xpm.gz
hiddenmenu
title Fedora 7 (2.6.21-1.3194.fc7)
root (hd0,4)
kernel /vmlinuz-2.6.21-1.3194.fc7 ro root=/dev/VolGroup00/LogVol00 rhgb quiet
initrd /initrd-2.6.21-1.3194.fc7.img
title Solaris XDE 9/07
rootnoverify (hd0,1)
chainloader +1
title Windows XP SP3
rootnoverify (hd0,0)
chainloader +1

after fedora update it became :

#boot=/dev/sda

default=0
timeout=15
splashimage=(hd0,4)/grub/splash.xpm.gz
hiddenmenu
title Fedora (2.6.23.15-80.fc7)
root (hd0,4)
kernel /vmlinuz-2.6.23.15-80.fc7 ro root=/dev/VolGroup00/LogVol00 rhgb quiet
initrd /initrd-2.6.23.15-80.fc7.img
title Fedora 7 (2.6.21-1.3194.fc7)
root (hd0,4)
kernel /vmlinuz-2.6.21-1.3194.fc7 ro root=/dev/VolGroup00/LogVol00 rhgb quiet
initrd /initrd-2.6.21-1.3194.fc7.img
title Solaris XDE 9/07
rootnoverify (hd0,1)
chainloader +1
title Windows XP SP3
rootnoverify (hd0,0)
chainloader +1

I couldn't get how fedora update can affect solaris grub menu , anyway I decided to reinstall solaris grub. To do so , I insert my installation dvd , restart my system and choose single user shell during sxde installation.
I mount my system in /a and execute the following command :

/sbin/installgrub -m /boot/grub/stage1 /boot/grub/stage2 /dev/rdsk/c0d0s0

(in your system it maybe /dev/rdsk/c1d0s0).

In this way , solaris grub recovered .I just added the following lines in solaris /boot/grub/menu.lst to boot linux from solaris grub menu :

title Fedora (2.6.23.15-80.fc7)
root (hd0,4)
kernel /vmlinuz-2.6.23.15-80.fc7 ro root=/dev/VolGroup00/LogVol00 rhgb quiet
initrd /initrd-2.6.23.15-80.fc7.img

click here to check out my discussion with jlliagre in http://www.linuxquestions.org/.

Update :: This method is also applicable for SXDE 1/08 grub menu reinstallation.

HD Audio driver for Solaris

After solaris (sxde 9/07 & sxde 1/08) installation , I found that my master volume is cross marked. It says me that either my sound device is not detected / installed (probably due to driver problem) or it has some configuration error.
my sound device has a profile like:

vendor : Intel corporation
model : 82801G (ICH7 family)
HD Audio controller
device setting : PCM device
CONEXANT analog


Anyway , After my web search I found open sound system driver which you can download from here. simply submit your operating system and download free driver. view the readme file for installation instructions.
I installed it in my system , restart and my sound device started working perfectly !!

Tuesday, April 8, 2008

Reboot Solaris

I am using solaris os (SXDE 9/07) and I am using the following command to reboot my system as no restart button is available in the start menu by default.

$su
Password:
#shutdown -y -i6 -g0

You can use "#reboot" if you are using SXDE 1/08 or OpenSolaris 2008.05.

Network Configuration in Solaris

I have a router : HUEWEI QUIDWAY WA1003A. My desktop pc and my laptop with 5 operating systems all together is connected through that router. I have disabled DHCP and using different static ip address for all of them. For solaris I set up a lan client in my router configuration with ip address 192.168.1.103 and mac address of my system.
NWAM was enabled by default. I took following steps to configure my network connection :
1)I edit /etc/nwam/llp which was previously :
wpi0 dhcp
and now :
wpi0 static 192.168.1.103/24
2)I edit /etc/defaultrouter
192.168.1.1
3)I add a default gateway permanently:
#route -p add default 192.168.1.1
4)I edit a line of /etc/nsswitch.conf which was previously :
hosts: files
and now ;
hosts: files dns
5)I edit /etc/resolv.conf
nameserver 192.168.1.1

after that I restart nwam ("svcadm restart nwam") and a pop up message told me that connection to WA1003A (MY ROUTER)has been established and got ip address 192.168.1.103.

This method I followed for SXDE 9/07 and SXDE 1/08. Check out my configuration details for OpenSolaris 2008.05 from here.

Thursday, April 3, 2008

Multi Boot system (Solaris , linux and windows)

Today I have installed solaris expressed developer edition (SXDE) in my system. This post would be helpful for those who want to install SXDE in their system with multiboot option.
I was trying to install three different operating systems like linux (fedora 7) , solaris (SXDE 9/07) and windows (xp professional).

I had vista ultimate in my system before. During my installation , first I delete a partition , then create a new primary partition of "linux-swap" filesystem by using gparted. sxde installation starts normally , continued upto 5% then show me an error "not enough space is available..." . 20Gb is recommended for SXDE and my partition was of 25Gb. I tried once more , but same thing happend again !
I started searching web and came to know that vista preinstalled systems behave really strange (due to different 'fdisk' system between vista and solaris) during solaris installation. (you can read it from here). Then I decided to shrink my last partition by 9 Mb. I did it with gparted , tried to install sxde twice , but same error stopped the installation process each time.

after that , I decided to format my whole harddisk . so , I took backup of every important data and formatted my 120 Gb harddisk into 4 partitions...
  • first partition : 25 gb for windows xp. (primary , ntfs).
  • second partition : 30 gb for sxde . (primary , linux-swap).
  • third partition : 25 gb for fedora 7. (deleted later , unallocated).
  • fourth partition : remaining for data.(logical,ntfs).
I installed windows xp first , then sxde and at last linux. During linux installation I have chosen "keep all partitions and use unallocated space" ; 'review and modify' : checked. In the second page I added windows xp (/dev/sda1) and solaris (/dev/sda2). (/dev/sda1) was already there in name of 'other'.

This time everything was going on normally and I was successful to install all of them in my system properly.