Hmmmm , there's something new !! Anyway getting started by New Project --> web --> web application. Give project name and location --> choose server --> select framework : visual web java server faces --> Finish. Here "page1.jsp" is your welcome page , (check out a green triangle before it which means that ! ). edit design / jsp / java code as you need. Here a new feature is added in 6.1 i.e ON DEMAND BINDING. "NetBeans IDE 6.1 features on-demand binding. Where components require Java coding, you must now manually add the binding attribute to components in a Visual Web JSF application. To do so, right-click each component and choose Add Binding Attribute. For more information, see the On-demand Binding Attribute Wiki."
Check out the following docs from NetBeans.org:
Developing a Visual Web JSF Application
Navigating Pages in a Web Application
Using Page Fragments
Converting and Validating Data in Visual Web JSF Applications
Understanding Scope and Managed Beans
Getting Started with Visual Web JSF Application Development
Friday, May 30, 2008
Tuesday, May 27, 2008
NetBeans IDE 6.1 : simple Web application
Now I have started developing web applications using NB 6.1 . Just click New project --> web --> web application. There's nothing new in setting up a new web project , I have followed the same as in 6.0.1 except an option for using a dedicated folder for storing libraries.
You can use a server of your choice : Apache Tomcat / GlassFish V2. Different frameworks are also available , select according to your need and start web programming.
As usual , "index.jsp" file will be created under Project name --> Web Pages --> WEB-INF --> index.jsp.This is your default welcome page of the program.you change the title , edit the body to write your own program. As html tags are used for designing a jsp program , netbeans provides a huge opportunity to write codes graphically. Just look at the Palette ([CTRL]+[SHIFT]+[8]) , you will find almost everything you need. If you put your mouse cursor on a button in the palette , html code will be appeared as tool tip text. simply drag and drop and design your html page."Html Forms" elements are used to take input from user and "HTML" elements are used for designing purpose.
Now write your first "Helloweb" program. Check out Docs and Support from netbeans.org : "Introduction to Developing Web Applications"
Playing more with "ejectDrive"
Now start playing with the same program by using the power of netbeans :
At first , click on the 'Runtime' of the following line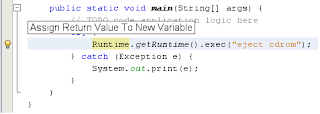
We will use this exec variable later to perform some another job.
When you executing the command "eject cdrom" in a terminal window , (I am using sxde 9/07) you will get something like :
Now if you want to print this line : 'cdrom /dev/dsk/c0t0d0s2 ejected' from your program you need to add the following lines in your code :
Now use netbeans code completion tool to write programs more easily.
Just write "Bu" and press [CTRL]+[SPACE] and you will get a drop down list of all which starts with 'Bu'. Use arrow cursors to find out BufferReader and press [RETURN].
In the same line when you are writing .....new InputStreamReader(exec.getInputStream()) , wait after writing 'exec.'..... and choose 'getInputStream' from the drop down box.
Now check out that 'BufferReader' and 'InputStreamReader' is underlined by red color which means there's an error in the code . you will also find a red bulb beside. Place your mouse cursor on it to get probable cause of the error and click on it to get possible solution. Just click on it and choose 'Add Import for java.io.BufferReader' etc.

So now everything is complete , indent / format using [CTRL]+[ALT]+[F] and save [CTRL]+[S].
Now 'Main.java' should look like :
Run your program to get desirable output.
At first , click on the 'Runtime' of the following line
'Runtime.getRuntime().exec("eject cdrom");'Now , you will get a yellow bulb in the left of the editor , same line position. click on it and it will tell you to "Assign Return Value to Variable". click on this line and
'Runtime.getRuntime().exec("eject cdrom");'will be converted to
'Process exec = Runtime.getRuntime().exec("eject cdrom");'

We will use this exec variable later to perform some another job.
When you executing the command "eject cdrom" in a terminal window , (I am using sxde 9/07) you will get something like :
bash-3.2$ eject cdrom
cdrom /dev/dsk/c0t0d0s2 ejected
Now if you want to print this line : 'cdrom /dev/dsk/c0t0d0s2 ejected' from your program you need to add the following lines in your code :
BufferedReader in = new BufferedReader(new InputStreamReader(exec.getInputStream()));
String line = null;
while ((line = in.readLine()) != null) {
System.out.print(line + "\n");
}
Now use netbeans code completion tool to write programs more easily.
Just write "Bu" and press [CTRL]+[SPACE] and you will get a drop down list of all which starts with 'Bu'. Use arrow cursors to find out BufferReader and press [RETURN].
In the same line when you are writing .....new InputStreamReader(exec.getInputStream()) , wait after writing 'exec.'..... and choose 'getInputStream' from the drop down box.
Now check out that 'BufferReader' and 'InputStreamReader' is underlined by red color which means there's an error in the code . you will also find a red bulb beside. Place your mouse cursor on it to get probable cause of the error and click on it to get possible solution. Just click on it and choose 'Add Import for java.io.BufferReader' etc.

So now everything is complete , indent / format using [CTRL]+[ALT]+[F] and save [CTRL]+[S].
Now 'Main.java' should look like :
/*
* To change this template, choose Tools | Templates
* and open the template in the editor.
*/
package ejectdrive;
import java.io.BufferedReader;
import java.io.InputStreamReader;
/**
*
* @author ritwik
*/
public class Main {
/**
* @param args the command line arguments
*/
public static void main(String[] args) {
// TODO code application logic here
try {
Process exec = Runtime.getRuntime().exec("eject cdrom");
BufferedReader in = new BufferedReader(new InputStreamReader(exec.getInputStream()));
String line = null;
while ((line = in.readLine()) != null) {
System.out.print(line + "\n");
}
} catch (Exception e) {
System.out.print(e);
}
}
}
Run your program to get desirable output.
Monday, May 26, 2008
NetBeans IDE 6.1 : simple java application
Don't worry , I won't start with "HelloWorld".. rather say "EjectDrive"..yes, my first program in this IDE was to eject my cd/dvd drive.
It's quite simple by using a terminal window. Just execute a command "eject cdrom" , and your drive will be ejected. Now we will simply try to execute the command from a java program :
1. setup a new project. File -> new project -> java -> java application -> next
2. give a project name , say ejectDrive.
here I have noticed that NB 6.1 provides an opportunity to use a dedicated folder for storing libraries . I will discuss later how it's beneficial to make tasks more simple.

'create main class' & 'set as main project' will be checked automatically , just click 'finish'.
3. Main.java will be opened in the editor window. Here just add the following code under the main method :
Now , your Main.java should look like this :
4. Right click -> format or [ALT]+[SHIFT]+[F] to maintain proper indentation.
5. save. [CTRL]+[S]
6. Run. [F6]
and your cddrive will be ejected.
Next : Playing more with "eject drive"
It's quite simple by using a terminal window. Just execute a command "eject cdrom" , and your drive will be ejected. Now we will simply try to execute the command from a java program :
1. setup a new project. File -> new project -> java -> java application -> next
2. give a project name , say ejectDrive.
here I have noticed that NB 6.1 provides an opportunity to use a dedicated folder for storing libraries . I will discuss later how it's beneficial to make tasks more simple.

'create main class' & 'set as main project' will be checked automatically , just click 'finish'.
3. Main.java will be opened in the editor window. Here just add the following code under the main method :
try {
Runtime.getRuntime().exec("eject cdrom");
} catch (Exception e) {
System.out.print(e);
}
Now , your Main.java should look like this :
/*
* To change this template, choose Tools | Templates
* and open the template in the editor.
*/
package ejectdrive;
/**
*
* @author ritwik
*/
public class Main {
/**
* @param args the command line arguments
*/
public static void main(String[] args) {
// TODO code application logic here
try {
Runtime.getRuntime().exec("eject cdrom");
} catch (Exception e) {
System.out.print(e);
}
}
}
4. Right click -> format or [ALT]+[SHIFT]+[F] to maintain proper indentation.
5. save. [CTRL]+[S]
6. Run. [F6]
and your cddrive will be ejected.
Next : Playing more with "eject drive"
NetBeans IDE 6.1
Netbeans IDE 6.1 has been released. For the past few months netbeans has been developed quite rapidly.. I was using version 6.0.1 before using the latest 6.1 version.
There's nothing new in installation process , except it's quite faster in comparison with previous releases. I have installed it in my solaris (solaris express developer edition 9/07) and linux (fedora 7) system. Click here to check out downloading and installation instructions.
Are you trying to install NB 6.1 in open solaris 05/08 ??? check out my experience.
Anyway , few things I have noticed just after the installation process :
* startup services : This IDE evolves a quick indexing of all necessary files from jdk installation directory , directories created under user's home etc. , performs a scanning task and compiles all source files from the open projects.
 ** Adds nb projects : All projects from "NetBeansProject" folder will be automatically added in this IDE as well as other NetBeans projects which resides in the same directory where netbeans is installed. If you have older versions installed in your system , nb settings can be imported in the latest version (just like previous releases).
*** Update notification : A popup message at the right hand corner will show you how many updates are currently available , apply them to make it up to date.

Click here to check out the features of Netbeans 6.1.
Next : Check out what's new in NetBeans 6.1..
Java application
Web application
There's nothing new in installation process , except it's quite faster in comparison with previous releases. I have installed it in my solaris (solaris express developer edition 9/07) and linux (fedora 7) system.
Click here to check out downloading and installation instructions.Are you trying to install NB 6.1 in open solaris 05/08 ??? check out my experience.
Anyway , few things I have noticed just after the installation process :
* startup services : This IDE evolves a quick indexing of all necessary files from jdk installation directory , directories created under user's home etc. , performs a scanning task and compiles all source files from the open projects.
 ** Adds nb projects : All projects from "NetBeansProject" folder will be automatically added in this IDE as well as other NetBeans projects which resides in the same directory where netbeans is installed. If you have older versions installed in your system , nb settings can be imported in the latest version (just like previous releases).
*** Update notification : A popup message at the right hand corner will show you how many updates are currently available , apply them to make it up to date.

Click here to check out the features of Netbeans 6.1.
Next : Check out what's new in NetBeans 6.1..
Java application
Web application
Tuesday, May 20, 2008
Add some skin to mplayer

Check out this post if you are not familier with mplayer.
When I installed mplayer in my solaris system using #pkg-get -i mplayer , the gmplayer from /opt/csw/bin already came with a skin. But it didn't happen in my linux system. So I decided to add skins manually.
1. download latest mplayer source from here , mine version was "MPlayer v1.0rc2 source".
2. apply './configure' , 'make' , 'make install' one by one.
3. download a skin from here , mine was Corelian 1.1.
4. extract files from the skin's tar / tar.gz / tar.bz2 file.
5. #cd /usr/local/share/mplayer/skins
6. #mkdir default
7. copy all files of 'Corelian' in the 'default' directory.
8. Then , I have tried to execute 'gmplayer' , but I get an error regarding 'True Type Font' not found.
9. I download a TTF and placed it somewhere.
10. launch gmplayer , right click on it , preferences --> font --> browse and give path of that TTF.
11. MPlayer automatically added in Applications --> Sound & Video --> MPlayer.
Mplayer is now ready... just play and enjoy !!!
Mount ntfs partitions of an external USB device in solaris
If you want to mount ntfs partitions from an external usb storage device , you need to follow first 2 steps from this post. then do the following :
#fdisk /dev/rdsk/c2t0d0p0
I got a result like :
......
6
#
above result told me that the first partition of my device , i.e c2t0d0p1 is a ntfs partition.
Then I do the following :
#cd /mnt
#mkdir usb
# mount -F ntfs -o ro /dev/dsk/c2t0d0p1 /mnt/usb
you can execute the following :
#rmformat
I got a result like :
I will encourage you to check out this documentation for more detailed information about usb storage support in solaris.
#fdisk /dev/rdsk/c2t0d0p0
I got a result like :
......
Total disk size is 9729 cylinders
Cylinder size is 16065 (512 byte) blocks
Cylinders
Partition Status Type Start End Length %
========= ====== ============ ===== === ====== ===
1 Active IFS: NTFS 0 2610 2611 27
2 EXT LBA 2611 9727 7117 73
SELECT ONE OF THE FOLLOWING:
1. Create a partition
2. Specify the active partition
3. Delete a partition
4. Change between Solaris and Solaris2 Partition IDs
5. Exit (update disk configuration and exit)
6. Cancel (exit without updating disk configuration)
Enter Selection:
6
#
above result told me that the first partition of my device , i.e c2t0d0p1 is a ntfs partition.
Then I do the following :
#cd /mnt
#mkdir usb
# mount -F ntfs -o ro /dev/dsk/c2t0d0p1 /mnt/usb
you can execute the following :
#rmformat
I got a result like :
Looking for devices...
1. Logical Node: /dev/rdsk/c2t0d0p0
Physical Node: /pci@0,0/pci152d,754@1d,7/storage@1/disk@0,0
Connected Device: ST380211 0A 3.AA
Device Type: Removable
Bus: USB
Size: 76.3 GB
Label:
Access permissions: Medium is not write protected.
2. Logical Node: /dev/rdsk/c0t0d0p0
Physical Node: /pci@0,0/pci-ide@1f,1/ide@0/sd@0,0
Connected Device: Optiarc DVD RW AD-7530A EX32
Device Type: DVD Reader/Writer
Bus: IDE
Size:
Label:
Access permissions:
I will encourage you to check out this documentation for more detailed information about usb storage support in solaris.
Subscribe to:
Posts (Atom)